
If you're a photographer, then you'll know that clients expect to be able to view and purchase your photos on your website. As the world's leading e-commerce platform, WooCommerce is hugely popular with professional photographers. However, it's missing some vital features for selling photos online.
While WooCommerce has all the basic e-commerce functionality you need, such as products, variations, categories and payment gateways, there are some gaps. Photographers need to use WordPress and WooCommerce to securely sell specific photos to each client, while keeping these photos private and hidden from everyone else. They need a quick way for customers to select multiple photos - with a choice of options for each one - and add them to the cart without having to click elsewhere. Photographers also need a quick way to bulk-upload photos to WooCommerce after a photoshoot.
Of course, one must not forget the importance of a photography-based WordPress theme to compliment your work. This article by CollectiveRay has plenty of great options for photography themes.
In this tutorial, we'll provide complete instructions on how photographers can achieve all these things with WooCommerce. We're going to do it by combining our own Feed In Gallery plugin with 2 plugins from UK WordPress agency Barn2 Media.
Your professional WooCommerce photography website
The end result will be a fully functioning WooCommerce photography website with the following features:
- Quick photo upload facility. Using Feed Them Gallery after each photoshoot session, you can mass upload all your photos directly to your WordPress website. Once you've done that, you can click a single button to bulk convert each photo into a purchasable WooCommerce product or choose to have the image converted to a product on image upload. This is much, much easier than creating complex CSV files to import. You only need to manually set the price and or variations for a product one time and then the rest happens automatically.
- Photo order form layout. Your clients can quickly choose a variation and quantity for each photo, and order prints in a range of sizes from a single order form page using the WooCommerce Product Table plugin. The order form will showcase your photos, as well as showing all the other information you need to sell them, such as the price and variation options. Customers can click on a photo to view a bigger version in a lightbox popup. This WooCommerce order form plugin encourages them to buy more, and they don't have to waste time clicking through to a separate page for each photo product.
- Private password protected category for each client or photoshoot. You will upload each client's photos to a hidden area of your WooCommerce store which only they can access. This is user-friendly for them, while secure and confidential.
Setup instructions - How to sell photos in WooCommerce
Step 1 - Create a sample product
- Before you start installing plugins, create a sample product via Products > Add New. The information that you add for this product will be used for all your photo products. For example, you will need to add information such as the price. If you want to offer a choice of product options (e.g. photo print size), then select the Variable product type and add attributes and variations to this sample product.
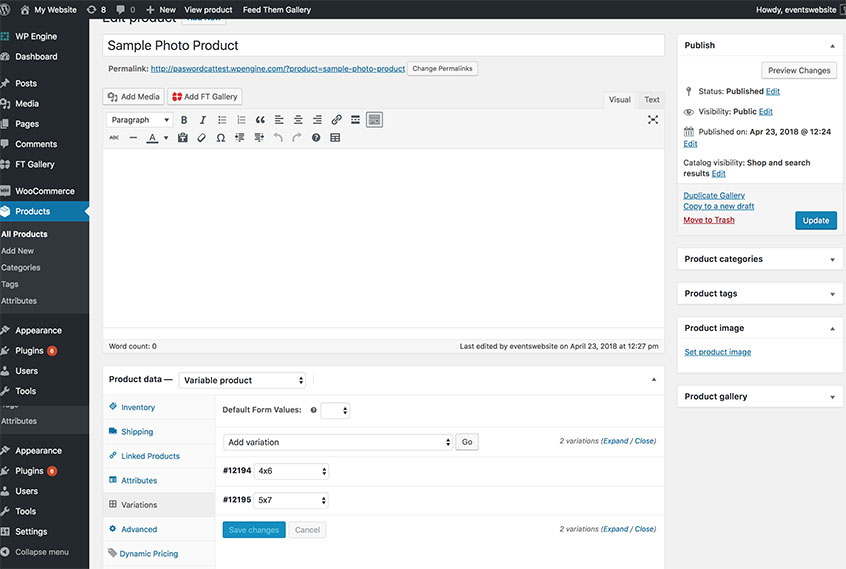
Tip: If you want to use different settings/prices for different galleries, then you can create more than one sample product. You can then select a different sample product for each gallery in step 7, below. For example, this is a good way to charge different prices for different types of photography, or to sell simple and variable products.
Step 2 - Set up Feed Them Gallery
- First, install the free Feed Them Gallery plugin. To do this, go to Plugins > Add New and search for 'Feed Them Gallery'. Install and activate the plugin.
- Next, get the premium Feed Them Gallery plugin - you need this for the WooCommerce features. Install and activate the plugin.
- Go to FT Gallery > Plugin License and follow the on-screen instructions to activate your license key.
- Now go to FT Gallery > Settings, scroll down to the WooCommerce section, and tick 'Attach Product to a Category named after Gallery'.
- Go to FT Gallery > Add Gallery. Drag the photos that you want to upload to the gallery and hit 'Publish'.
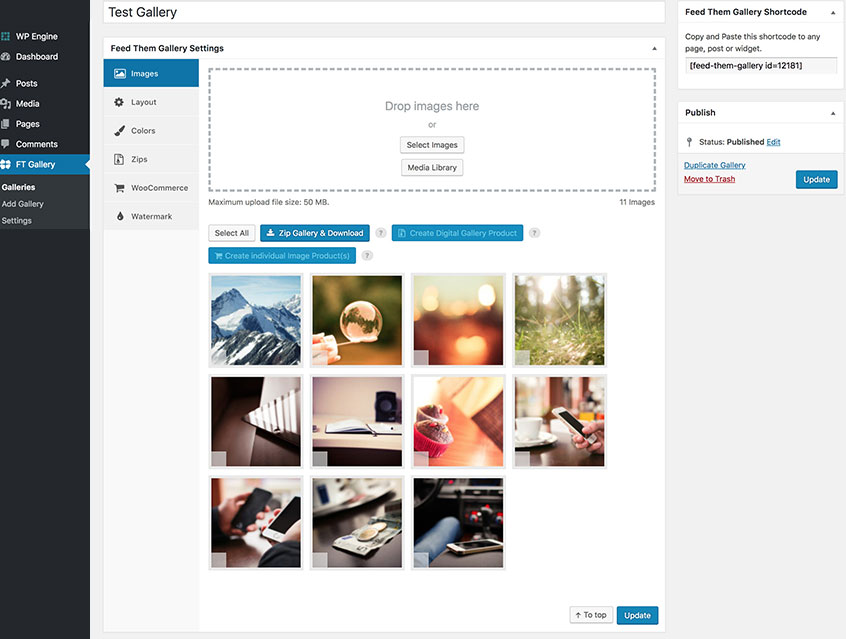
- Now go to the WooCommerce tab for the gallery you just created. Tick 'Auto Create a product for each image uploaded' and select the sample product you created in Step 1 from the 'Single Image Model Product' dropdown.
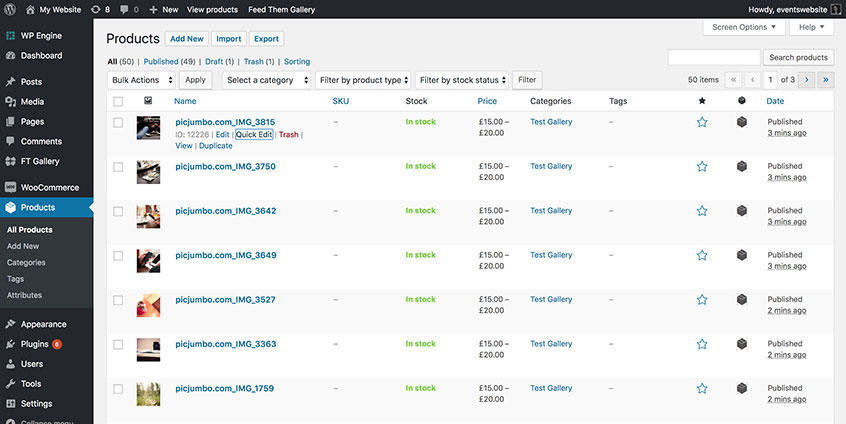
- Click 'Update' and you will be taken back to the 'Images' tab for the gallery. Under the image upload area, you'll see a button called 'Create Individual Image Products'. Click this and the plugin will convert your photos into individual WooCommerce products, with the same pricing and variations as the sample product. It will also create a dedicated category for these photos.
Step 3 - Create WooCommerce photo order forms
- Next, it's time to list your photos in an order form layout. You'll need the WooCommerce Product Table plugin for this.
- Get WooCommerce Product Table and install and activate the plugin.
- Go to WooCommerce > Settings > Products > Product tables and add your license key. Read through the list of options and use them to configure how you want your WooCommerce photo order forms to work.
- Now, it's time to add product tables to the category archive template in your theme. This will use the photo order form layout to all your client-specific photo category pages in WooCommerce. To do this, download the sample file from this page and follow the instructions to set it up.
Tip: On the WooCommerce Product Table plugin settings page, choose the settings that will encourage customers to buy more. For example, use the add to cart checkbox option because this makes it easy for them to tick multiple products. Use variation dropdowns and enable the quantity picker so that customers can choose options and quantities directly from the order form page. Use the image size option to showcase your photos more effectively.
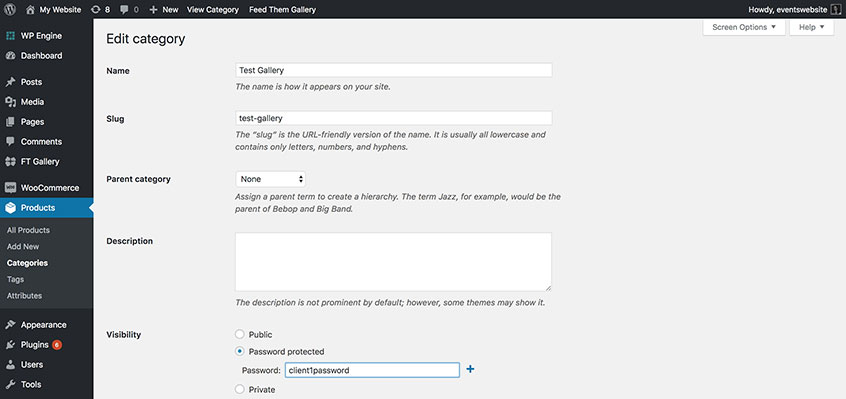
Step 4 - Create private photography client WooCommerce categories
- Finally, it's time to protect your photos so that only specific photography customers can view them. You'll need the WooCommerce Password Protected Categories plugin for this.
- Get WooCommerce Password Protected Categories and install and activate the plugin.
- Go to WooCommerce > Settings > Products > Password Protected Categories and add your license key. Read through the options and change the wording etc. of your photography client login page.
- Now, go to Products > Categories and edit the category that was created by the Feed Them Gallery plugin in Step 8. In the Visibility settings, choose the 'Password Protected' option and add 1 or more passwords. You'll need to give the password to your client.
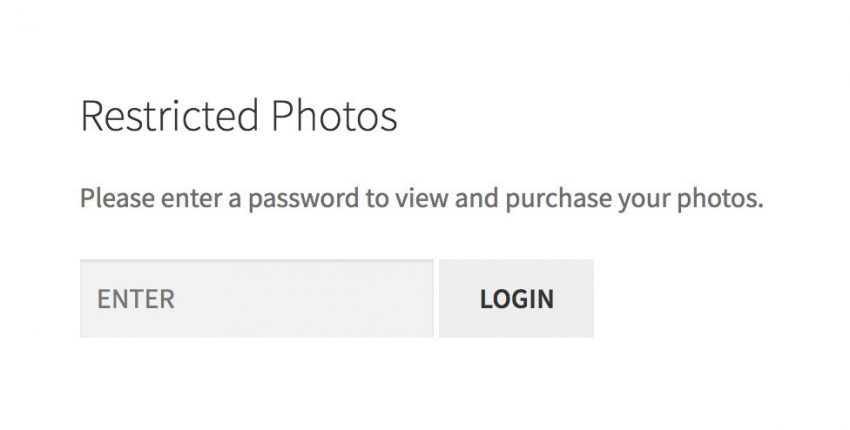
- The final step is to create a client login page. Create a new page and add the shortcode
[category_login], then link to this from your navigation menu. Clients will visit this page and enter their password to see their private photo products displayed in a neat order form layout. They can then select variations, buy photos and pay online using the WooCommerce checkout.
In Closing
We hope this article brings you one step closer to selling your photos and becoming a success! A big thanks to Katie Keith from barn2.co.uk for taking the time to create this wonderful tutorial and video, you Rock!